Form and Imagery in Colored Clays


Form and Imagery in Colored Clays – Five-day Workshop
(Click HERE for a PDF of Background, Description, and Schedule)
Background
Colored clay techniques have been in use for over 4000 years, and yet aside from closely related slip decorating methods, they have been largely ignored in the evolution of Western ceramics in favor of glaze surfaces where the true nature of the claybody is often concealed. Except for isolated historic examples such as pate-sur-pate, basaltware, sprigging, and marbleized wares, it is only recently that colored clays have become a visible part of the ceramics mainstream. Colored clays and slips offer extraordinary richness and depth of color which is distinctly different from glazed surfaces. With patterned colored clay loaves, you can achieve a multitude of pattern and image effects available through no other ceramic technique.
Techniques to Be Covered
Toxicity concerns with colored clays, oxides, and ceramic stains, making/mixing colored clays, marbleized and patterned colored clay loaf construction, lamination of colored clay veneer onto slabs and forms, creation and use of colored clay murrini, construction of simple soft-slab and stiff-slab forms, use of colored clays in wheel-thrown forms.
Workshop Description
This workshop is designed to provide a thorough introduction to patterned-loaf colored clay techniques in a relaxed but productive atmosphere. Although previous experience with clay is an advantage, these techniques can also provide a good beginning in clayworking. The pace at which you work is entirely up to you. I will provide the information and ideas for the projects and methods. You may wish to do them all, or you may wish to concentrate on specific techniques. In this case, I recommend that you attempt to do all of the colored clay loaf patterns that interest you while you are here at the workshop, so that I can assist you with any questions or problems.
With every workshop group the pace is different, and it is conceivable that we might not cover all the techniques listed. Foreseeing that possibility, you will receive handouts which include all the technical information and describe the methods in detail. This should provide enough information for you to continue with your colored clay work after the workshop is over. We will bisque-fire as much work as possible to simplify transport, but the primary emphasis of this workshop is on patterned clay loaf development.
A great appeal of colored-clay techniques is that very effective work can be created with a minimum of studio facilities and equipment. A slab-roller, spray-booth, potter’s wheels and hi-fire kiln are nice to have, but this kind of work can be done very effectively with nothing more than work tables and an electric kiln.
We will accomplish a lot in the next five days, and you can get a great deal of work done if you are diligent. I encourage you to be inventive and to make things which are meaningful to you. However, if you want to learn as many colored clay techniques as possible, it would best to keep your projects simple and small. This will also help with rapid drying and firing.
Workshop Schedule
This schedule must remain flexible, because every group is different and the pace varies.
- First Day Morning – Intro to workshop, receive mason stains, wedge colorants into white clay to give five-pound balls of black, brown, blue, green, and yellow. It is up to you to decide how much of the stain to wedge in, depending on how intense you want your colors to be. If you use up your allotment of mason stains you can always use ceramic oxides instead, which work fine but do tend to stain your hands. First half of slide show on historical and contemporary colored clay.
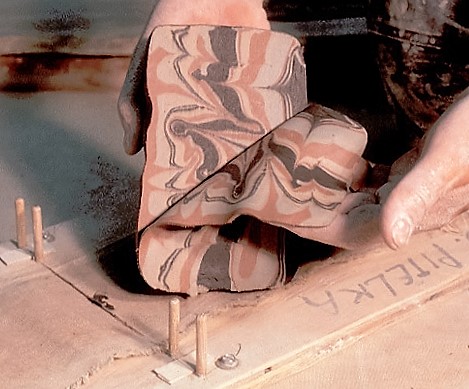
- First Day Afternoon – Demonstration of layered and veined marbleized loaves, wood-grain loaf, and butterflied layered loaf. Work on marbleized, grained, and/or layered loaves. NOTE: moisten clay frequently with vinegar water while fabricating loaves, so that clay is still aggressively tacky when assembling.
- Second Day Morning – Demonstration of patterned loaf construction. Work on patterned loaves. Second half of slide show on historical and contemporary colored clay.
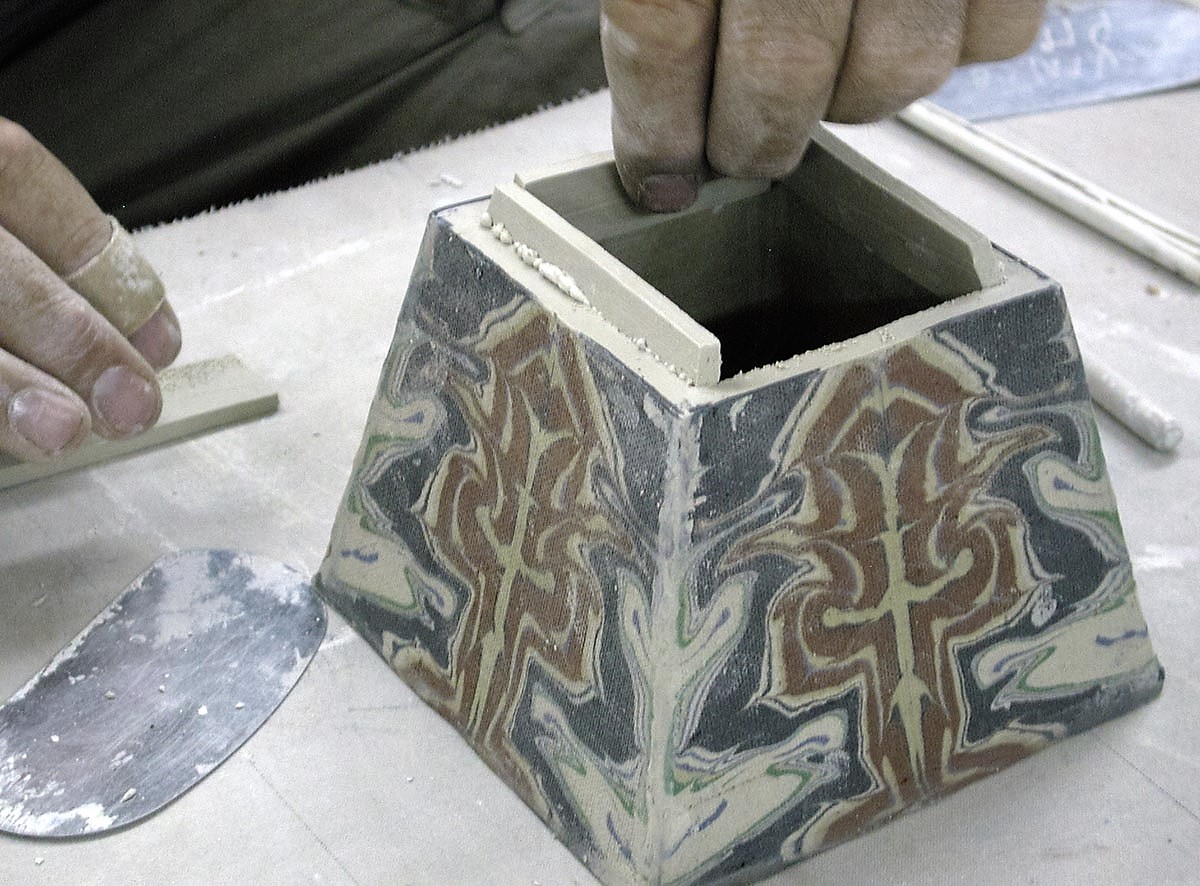
- Second Day Afternoon – Demonstration of patterned loaf construction. Demonstration of laminating patterned clays onto slabs. Work on patterned loaves, lamination onto slabs.
- Third Day Morning – Demonstration of patterned loaf construction. Work on patterned loaves, lamination on slabs.
- Third Day Afternoon – Demonstration of soft slab and stiff-slab forms using laminated slabs. Work on patterned loaves, laminating onto slabs, soft/stiff-slab forms.
- Third Day Afternoon or Evening – Slide show on Vince’s work.
- Fourth Day Morning – Demonstration of patterned loaf construction. Work on patterned loaves, soft/stiff-slab construction. Load bisque fire with any wares that are dry.
- Fourth Day Afternoon – Discussion of use of colored clays in thrown work. Work on patterned loaves.
- Fifth Day Morning – Discussion of granite loaf. Demonstration of clay murrini, clay marquetry, ways of distorting or altering pattern slices. Unload bisque fire. Discuss results. The workshop generally ends around lunchtime.
Materials Supplied by Hosting Venue
(Click HERE for a PDF of the Materials and Facilities List for Workshop Host)
Generally, clay, stains, and cutting/slicing jigs are furnished by the workshop host, with cost of stains, cutting/slicing jigs, and the first box of clay included in fees paid by participants. Additional clay should be available for purchase onsite.
- Gritless white cone-6 or cone-10 clay (as white as possible in the damp state) – 50# per participant, 100# for instructor, plus plenty of extra. Nothing saps the life out of a workshop like running out of clay.
- Mason stains (#6600 Best Black, #6464 Yellow Zirconium, #6300 Mazerine Blue, #6126 Hazelnut, #6223 Ivy Green – 1# of each for my demos, 1/2# of each for each participant, divided up in Ziploc sandwich bags.
- One half-gallon white vinegar
- One quart of joining slurry made in advance from the claybody. Cut 3# of clay into thin slices and dry completely. Break up the bone-dry clay into smaller pieces (not crushed) and immerse in water with several inches of water covering the clay and let sit overnight. The clay will slake down to slurry by itself. Next day, drain off all excess water, mix with drill impeller mixer or hand blender until completely smooth with no lumps, add one cup of vinegar, add water carefully, mixing frequently, until slurry will not pour if you tilt the bucket, but will if you shake it.
- One box each of quart and gallon Ziploc bags.
- One roll of plastic wrap.
- Two standard propane canisters for a hand-held propane torch (I’ll bring the torch).
Facilities and Equipment Provided by Host
- Digital projector, appropriately dark room with large screen or white wall.
- Large sturdy work tables suitable for handbuilding and decorating. Heavy plywood-covered tables are best, but sturdy 3×6′ folding tables will work, with no more than four participants per 4×8′ table and two per folding table, with several additional tables to accommodate clay slicers.
- 24″ stool for instructor.
- Heavy-duty rolling pin with 12″ by 3″ body and bearing-mounted handles (unless I bring my own). If you are buying one, go to amazon and enter “Medium Commercial Rolling Pin by Thorpe” in the search box. This one’s a beauty, and it isn’t worth it to get a cheaper or smaller one.
- Potter’s wheels with standard bat pins.
- A generous supply of throwing bats and wareboards.
- Slab-roller
- Six 36″ by 24″ (or whatever width fits the slab roller) sheets of unprimed 10 oz. canvas duck. “10-ounce” is a trade reference to the weight per yard for canvas sold in art supply stores. If you buy canvas from a fabric, sail or house painting supplier they might not that reference, but just get sturdy uncoated canvas while avoiding stuff that is excessively heavy – it should still be very flexible.
- Clay veneer slicers and vertical slicing frames for instructor and each participant, made as per instruction provided by instructor.
- Plastic spray-bottle for vinegar water
- Two clear plastic snap-lid storage bins approximately 12x24x8″ deep.
Supplies for Participants to Bring
(Click HERE for a PDF of the Supply List for Participants)
You will need to have all of these supplies in order to learn the techniques and do the projects. Kemper tools are available from amazon or any art supplier. Stanley Surform tools are available from amazon – enter “Stanley Surform” in the search box.
- Standard clay tools – the packaged Kemper kit contains a wood rib, stainless-steel scraper-rib, wood knife, needle tool, cutoff wire, small sponge, and trimming tools
- Six 36″ by 24″ (or whatever width fits the slab roller) sheets of unprimed 10 oz. canvas duck. “10-ounce” is a trade reference to the weight per yard for canvas sold in art supply stores. If you buy canvas from a fabric, sail or house painting supplier they might not that reference, but just get sturdy uncoated canvas while avoiding stuff that is excessively heavy – it should still be very flexible.
- Good quality rolling pin with bearing-mounted handles. If you want to get a really superior one that will serve you well, go to amazon and enter “Medium Commercial Rolling Pin by Thorpe” in the search box. This one’s a beauty, and it isn’t worth it to get a cheaper or smaller one.
- X-Acto knife – pencil handle with 1″ tapered blade – no substitutions – for a superior knife, get one with the adjustment knob at the opposite end from the blade, like the X-Acto “Gripster.”
- Kemper S-10 stainless-steel serrated rib.
- One package containing at least three sheets of 100-grit mesh-type sandpaper (made for sanding drywall).
- Scotchbrite green scrubby pad.
- Several soft cloths (T-shirt material is great)
- Spray bottle for vinegar water.
- Small bucket for water
- Stanley Surform Shaver (short curved blade) and Surform Pocket Plane (5″ flat blade) – get both – these are made to be woodworking tools, but they are excellent for shaping and shaving leather-hard clay.
- 12″ ruler
- Apron (optional)
- Several dry-cleaner bags or trash bags to cover damp wares
- One dozen quart-size Ziploc bags
- One dozen gallon-size Ziploc bags
- One roll plastic wrap.
- If you are driving, bring two 12x18x8″-deep (approximately) clear (if possible) plastic snap-lid storage bins for keeping colored clay loaves and for slow-drying damp wares. Bring your supplies in a separate box so that the bins will be available for their intended use.
If you have any questions or are interested in hosting one of my workshops, please email me.